On the configuration of Virtualbox Networking

I’m one of those guys who is always struggling with the network configuration of VirtualBox images. I understand NAT, but what is the effect? And what the heck is the difference between Bridged Networking and Internal Networking?

On the Oracle site are also found blogs. A great one is from the Fat Bloke and contains a post which explains the configuration of Virtualbox networking all very simple:

https://blogs.oracle.com/fatbloke/entry/networking_in_virtualbox1

If you have any problems with connectivity between your guest and host, go check out this article! It also explains very clearly when to use what configuration.

configuration of Virtualbox networking: options dialog
Virtualbox network options dialog

How to download all images from your Flickr account

I’ve been a Flickr Pro user for many years in a row. Lately, I haven’t been using the site so much. I think Yahoo! has been missing the boat by not making any big improvements to their services and forgetting mobile altogether (their current Flickr app is a sorry excuse for social software). The biggest letdown however, is the lack of good tools for downloading en managing your images.

When my Pro account ends, I have no access to my fullsize images, and I want a complete download of al my content, so I can host them elsewhere. Antagonist now has unlimited storage and bandwidth for approximately 7€ a month, which is a bargain.

It took me some time to figure out a decent way to get all the images. One of my biggest requirements was, that the downloaded files had a filename equal to the title on the site (e.g. “London Eye”), and not the Flickr filename, which is not really human readable . the app promoted by Flickr itself is Downloadr, which only works in Windows, or Bulkr, which is quite good but the full version costs a hefty $30 a year.

How to download all images from your Flickr account

Here are the step for my free and successful download of all images and videos in full resolution:

  1. go to Flickr.com, login and in the Menu, go to”You”–>”Organize”.flickr-menu
  2. Create a new set, and add all of your images (or all the images you prefer to download)
  3. go to Flickandshare.com, and authorize the website to access your content. You can revoke that later if you want.
  4. Go through the wizard (all straightforward) and select the set you want to download.
  5. A link with all the URL’s to your images is provided. Including the original image title in the link. Copy this link or note it down.
  6. For the next step you’ll need Firefox. Download it here if you don’t already have it.
  7. After installation, go to Addons in the menu (Crtl+Shift+A in Windows), and search for the plugin “DownthemAll
  8. Install it and restart Firefox.
  9. Go to the link provided in step 5.
  10. Start the plugin from the menu:
    downthemall-menu
  11. A dialog appears. To use the original Flickr titles instead of filenames, change the mask to “*flattext*.*ext*”. Use the tag label to the right of the field to select another template. In the filters section, you can select what filetypes you want to download. Don’t forget to provide a download folder
    .downthemall-dialog
  12. After pressing “start”, a progress dialog appears and all your precious pictures are downloaded automatically. Presto!
    downthemall-progress


It is a true shame that Flickr doesn’t provide any tools for bulk uploading or downloading. Especially for Pro users this is a must-have.

You might want to consider making a donation to FlickandShare or DownThemAll.

Installing Guest Additions on Oracle Enterprise Linux

When installing Oracle Enterprise Linux in VirtualBox, or downloading one of the available images on Oracle Developer Days, it  can be tricky installing the Guest Additions. I was struggling with those, until I found a very useful blogpost by  R.Wang. This worked like a charm for me!

Only thing you might want to check, is the kernel version you are using. In bullet 5 is referred to the KERNEL_DIR. In your specific case the version number might be different. go to /usr/src/kernels and check for the latest kernel version in that directory. Also, there was no need for me to alter the yum.repos.d.

You can find the steps for installing the Guest Additions right here.

“X11 connection rejected because of wrong authentication”. Now what?

[weblogic@server ~]$ xclock
X11 connection rejected because of wrong authentication.
X connection to localhost:12.0 broken (explicit kill or server shutdown).

If you get this annoying message, you probably need to start an X11 application (for instance, for running the OUI or Oracle Universal Installer) from Unix or Linux. And you are here because you don’t know how to solve it.

Well, this trick usually works for me:

login as administrator or root, and enter:

[root@server ~]# echo $DISPLAY
localhost:13.0
[root@server ~]# xauth list
server/unix:10  MIT-MAGIC-COOKIE-1  b72cdb7673e4029ee232667d67f36f7e
server/unix:11  MIT-MAGIC-COOKIE-1  f216396c3a7fe040c23c76d46a142278
server/unix:12  MIT-MAGIC-COOKIE-1  ded8d0fb465fb02988ecbfb4e3f12178
server/unix:13  MIT-MAGIC-COOKIE-1  5e49789500114d6387b9e6ee9a6e5d6a
[root@server ~]#

now login as the user which needs to start the X-session process.

enter:

[root@server ~]# su - weblogic
[weblogic@server ~]$ echo $DISPLAY
localhost:13.0
[weblogic@server ~]$ xauth add server/unix:13  MIT-MAGIC-COOKIE-1  5e49789500114d6387b9e6ee9a6e5d6a
[weblogic@server ~]$ xclock
Warning: Missing charsets in String to FontSet conversion
[weblogic@server ~]$

you’re set to go!

If this does or does not work for you, or you have a better solution, please leave me a message!

Creating mockups for iPhone, iPad and Android

Last week I posted about the new productivity apps in Google Drive. There’s another little gem hidden there.

Ifui-elements-mobile you’re interested in making mockups or prototype drawings for iOS and Android, go and check out the Cacoo app in Google Drive. There’s a whole section of UI elements for iPhone, iPad and Android devices under the Software section of the right pane.

The standalone version of the mockup tool Balsamiq has plenty of options for mobile prototyping and wireframing, but the Google App version unfortunately is extremely limited.

If mobile development is not your cup of tea, you can of course always check out the ER-, flowchart-, or UML elements in Cacoo.

More productivity apps for Google Drive

Google just gave you one excellent reason for making more use of their Google Drive (Formerly Known As Google Docs). In fact, this might me a killer feature.

When you open Google Drive, and click “Create”, there is a new option “Add new apps”. A popup appears where you can choose a myriad of apps.

drive apps

A few particular apps caught my attention, as I have been using them in my role as application designer or information analist.

  • Balsamiq Mockups is a great tool for creating fancy mockups and sketches of user interfaces. It’s a commercial application, but now you it’s available for you always and everywhere at no cost!
  • Cacoo Diagramming. A nifty tool for creating all sorts of flowcharts and diagrams, including UML symbols. Can’t live without a tool like that and useful when I do not have Visio at hand.
  • Gantter; no project manager can do without a decent Gantt charting tool.
  • Sliderocket. Reminds me vaguely of….. Powerpoint. Yes, would be nice to have another template library for your presentations once in a while, right?

Anyway, do yourself a pleasure and browse through the dozens of apps and tools, from music streaming, to image enhancing tools, UML editors and more.

Did you find any great apps which are worth more than a mention here? Please let me know!

Some tips on deployment of Application Express applications

I wrote a blog entry on my company’s Blog with some tips on deployment of Application Express applications. It describes the pitfalls on manual and automatic deployment, and other useful tips.

You can find it here on the Whitehorses blog.

Excerpt

The most common method of deployment in Apex is to export the application via the web interface, and import it into another. However, there are some things you need to consider, such as supporting objects and shared components. Also, administrators have their own requirements, such as that all deployments should be scriptable. This can lead to problems.


If you have any comments or questions, feel free to place a comment here or on the Whitehorses site and I’ll update the blog.

fixing column width of password field in Internet Explorer

In Internet Explorer, the password field is a bit smaller than a regular textfield, causing them not to line up neatly. A very annoying little bug that messes up your page layout.

Firefox, Chrome and Safari behave nicely here.

The problem is caused by the font type Internet Explorer uses for it’s password field. This is often different than the other fields. I found a simple trick to make them equal size: set the same font on all the fields with CSS.

The easy way is to put the following code in your HTML page header:

<style type="text/css">
  input 
  { font-family: sans-serif; }
</style>

Now, all input items  on the page have the same font, making sure that Internet Explorer renders them with equal length.

In case you’re wondering where the name sans-serif comes from, check out an interesting explanation here of the classification of fonts.

How to copy users to new workspace in Application Express

In Application Express, there is no standard way of copying users in an existing workspace to a new workspace. Everytime you create a new workspace, all developers and users must be added manually.

Here’s a little script that does the work for you. Just replace the WORKSPACE with the name of your own workspace where you want to copy the users from, and execute in a SQL Command window in a new workspace. Might save you some time!

declare
cursor c_usr is
  select t.user_name, t.first_name, t.last_name, t.email_address
   , t.default_schema
   , fd.developer_role
  from APEX_040100.WWV_FLOW_FND_USER t
  join apex_040100.wwv_flow_developers fd on fd.user_id = t.user_id
  where t.security_group_id = ( select cp.PROVISIONING_COMPANY_ID 
                                from apex_040100.wwv_flow_companies cp 
                                where cp.short_name = 'WORKSPACE')
  ;
begin
for r_usr in c_usr loop
  APEX_UTIL.CREATE_USER(
        p_user_name                     => r_usr.user_name ,
        p_first_name                    => r_usr.first_name,
        p_last_name                     => r_usr.last_name,
        p_description                   => null,
        p_email_address                 => r_usr.email_address,
        p_web_password                  => 'Welcome01',
        p_developer_privs               => r_usr.developer_role,
        p_default_schema                => r_usr.default_schema,
        p_allow_access_to_schemas       => null,
        p_change_password_on_first_use  => 'Y'
        );
    end loop;
  end;

I never understood why this is not a standard function in Application Express, but the above snippet is easily converted into a function for reuse.

Adding custom tooltips to Application Express with qTip2

A question often asked by users, is the addition of custom tooltips with extended functions (like line breaks or formatting) to Application Express. There is no default functionality in Apex for that, other than the standard alt or title tag in HTML, which I think is rather boring and not so flexible.

There is a more versatile and nice looking alternative for that, called qTip2. It’s an extension for JQuery, which is already incorporated in Apex since version 4.0.

I found it a little challenging to get qTip2 working in Apex, so here’s a how-to for you.

  1. Download the javascript code at craigsworks. The download contains a file with Javascript code and a CSS file.
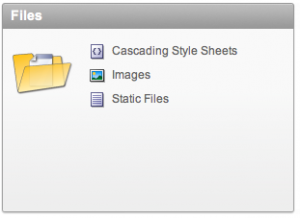
  2. Upload the two files (you can choose a minified or a human readable version) to your application’s Shared Components. There are sections for Cascading Style Sheets and Static Files (for the javascript) in the Files part.
  3. You need to include the javascript and CSS in your Apex page (or on page 0 to have them linked everywhere in your Application).
  4. go to the Edit Page section and add this to the HTML Header Atribute :
    <link type="text/css" rel="stylesheet" href="#WORKSPACE_IMAGES#jquery.qtip-2.0.0.css" />
  5. Add this to the Footer Text Attribute a little lower:
    <script type="text/javascript" src="#APP_IMAGES#jquery.qtip.js"></script>
  6.  And add this code to the Function and Global Variable Declaration. It replaces the standard title attributes with the qTip attribute. Mind you: all title attributes on the page. That’s ok, it ensures a consistent look of your tooltips on the page.
    $(document).ready(function()
    {
     $('a[title]').qtip();
    });
    Your page now looks like this:
    
  7. Now let’s give it a try. Create a new Text item on your page, and put this in the Label attribute:
    <a href="#" title="Your <i>custom</i> label Tooltip">A tooltip label</a>
  8. And look at the result:

This is a basic example of what you can do with a little help from third party javascript libraries, in this case JQuery with qTip2. Take a look at the examples at the qTip2 website, there is a lot you can change e.g. background colours, fade effects and positioning.

Of course you can also use the syntax used in step 7 in other parts of your page, like report headers, poplists or just plain text.

By using this site you acknowledge the use of cookies (which are mostly harmless, btw) More information

The cookie settings on this website are set to "allow cookies" to give you the best browsing experience possible. If you continue to use this website without changing your cookie settings or you click "Accept" below you are agreeing to these settings.

Close